Using Office 365 Stream at UB
Office 375 Stream automatically adds closed captioning to any video. I have been using Stream to manage my lecture videos for my UBlearns courses. So I thought I would share the steps I use to add closed captioned videos to UBlearns.
- Login to office.com using your UBIT Username and password.
- At the bottom of the left side navigation, click the All Apps icon:

- In the page of available applications, click the Stream icon:
- Then choose "My content":

- Then choose "Videos":

- Browse on your local machine to where your video is stored, then drag your video to the "Drag files here, or browse to upload" text:

- Click on the video file after it is fully uploaded to view the video file.
- Click the "options" dropdown:
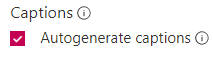
- Under "Captions", check the "Autogenerate captions" checkbox:
- Once the "processing is complete" clcik: Publish

- Then choose "My content":
- Then choose "Videos":